Install Cocos2d-iphone

Cocos2d ဟာ iPhone 2D Game ရေးဆွဲဖို့အတွက် opensource framework တစ်ခုပါ။ game တွေကိ ုမြန်ဆန်လွယ်ကူအောင် ရေးဆွဲဖို့အတွက် framework တွေထဲက opensource framework တစ်ခုပါ။ အခု iphone အတွက် ဖြစ်တဲ့အတွက်ကြောင့် Mac OS 10.6 နဲ့Xcode ရှိထားဖို့လိုပါတယ်။ Cocos2d က အစက python နဲ့ရေးထားပြီးတော့ objective-c အတွက် သီးသန့် ပြန်ရေးထားတယ်လို့ ဆိုပါတယ်။

ဟုတ်ပြီ။ ကျွန်တော်တို့ အရင်ဆုံး http://www.cocos2d-iphone.org/download မှာ download လုပ်လိုက်ပါ။ stable version က cocos2d-iphone-0.99.4.tar.gz ပါ။ rc version ကတော့ cocos2d-iphone-0.99.5-rc1.tar.gz ပါ။ rc1 အခြေအနေ ရောက်နေတဲ့အတွက် stable မဖြစ်ပေမယ့် တော်တော် အဆင်ပြေပါတယ်။ 0.99.5 နဲ့ o.99.4 က ကွာတဲ့ အချက်တွေ ရှိပါတယ်။ 0.99.5 မှာ iPhone 4 retina display အတွက် hd image တွေ ထည့်လို့ရလာပါတယ်။ 0.99.4 ကတော့  iPhone 4 မှာ hd အနေနဲ့ support မရနိုင်ပါဘူး။ ဒါကြောင့် 0.99.5rc1 ကိုပဲ download ချစေချင်ပါတယ်။

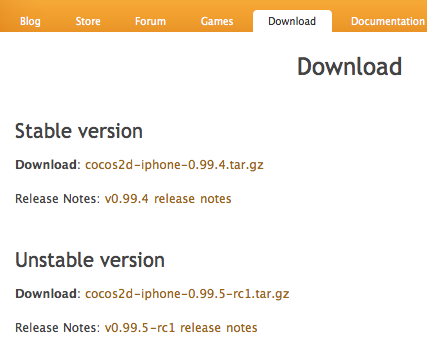
cocos2d-iphone-0.99.5-rc1.tar.gz ကို ဖြည်လိုက်ပါ။ ပြီးရင် terminal ဖွင်ပြီး ဖြည်ထားတဲ့ folder ကို သွားလိုက်ပါ။

Terminal မှာ

$sudo sh install-templates.sh

ဆိုပြီး ရိုက်ပြီး cocos2d ကို သွင်းနိုင်ပါတယ်။ ပြီးရင် xCode ကို ဖွင့်လိုက်ပါ။ Create new project လုပ်လိုက်ရင် cocos2d template ကို user template အောက်မှာ တွေ့ပါလိမ့်မယ်။

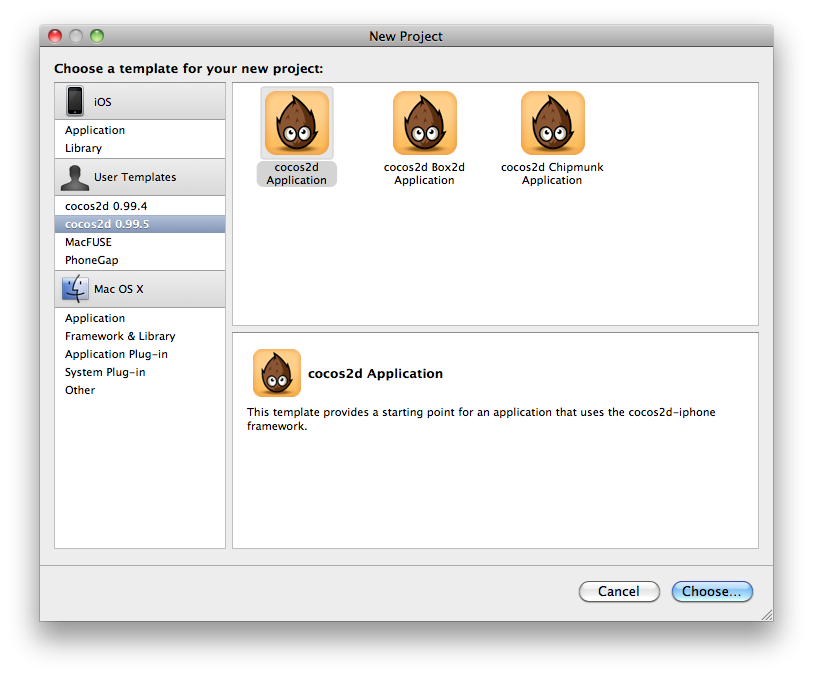
အခု cocos2d သွင်းလို့ရသွားပြီဆိုတော့ နောက်ပိုင်း cocos2d နဲ့ game ရေးပုံလေးတွေ ဆက်လက်ရေးသားပေးပါ့မယ်။

Starting Game Development

အရင်အလုပ် web development ကနေ ဘာမှ မဆိုင်တဲ့ iphone game development ကို ရောက်သွားတော့ စာတွေတော်တော် ပြန်ဖတ်လိုက်ရတယ်။ နောက်ပြီး မသိတာတွေ တော်တော်များများလည်း လေ့လာလိုက်ရတယ်။ Game Devloper လုပ်ချင်တဲ့ သူတွေ အရင်ဆုံး ကိုမြင့်ကျော်သူရေးထားတဲ့ post လေးတွေကို ဖတ်သင့်တယ်။ ကိုမြင့်ကျော်သူကတော့ Game Dev နဲ့ ပတ်သက်လာရင် ဆရာကြီး တစ်ဆူလို့တောင် ဆိုလို့ရမယ်။ မြန်မာနိုင်ငံကနေ နိုင်ငံတကာကို game ရောင်းနေတဲ့ Total Game Studio ဆိုပြီး အောင်မြင်တဲ့ Game Studio တစ်ခုလည်း ရှိတယ်။ ဒါကြောင့် Game Developer မလုပ်ခင်မှာ သူရေးထားတဲ့ post လေးတွေကို ဖတ်သင့်ပါတယ်။
Continue reading “Starting Game Development”

Real-time web applications

အခုအချိန်မှာ real-time web applications ဆိုတာက မြန်မာနိုင်ငံနဲ့ အလှမ်းကွာသေးပေမယ့် သိသင့်ပါတယ်။ အထူးသဖြင့် google doc က အကောင်းဆုံး real-time web applications ပါပဲ။ ဒီဘက်က စာရိုက်လိုက်တာနဲ့ ဟိုဘက်မှာ ချက်ခြင်း သွားပေါ်တယ်။ Real-time web applications က chat လိုမျိုး web applications တွေမှာ တော်တော်ကို အသုံးဝင်ပါတယ်။ real time chatting ပေါ့ဗျာ။ သာမာန် သမာရိုးကျ နည်းလမ်းက ဟိုးအရင်တုန်းကတော့ iframe သုံးပြီး refresh ကို ၅ စက္ကန့် တစ်ကြိမ် လုပ်ကြတယ်။ နောက်ပိုင်း ajax ပေါ်လာတော့ iframe အစား ajax နဲ့ ၅ စက္ကန့် တစ်ခါ refresh လုပ်ရပြန်တယ်။

Continue reading “Real-time web applications”

Learn Objective-C : Day 6

ဒီနေ့တော့ Day 6 ရောက်ပါပြီ။ ဒီနေ့က categories လို့ခေါ်တဲ့ cocoa Touch အကြောင်းပါ။ လက်ရှိ object တွေကို implement ထပ်လုပ်တဲ့အကြောင်းပေါ့။ အရင်တုန်းက ရေးခဲ့တဲ့ အပိုင်းတွေကတော့

Other Articles In This Series

Categories

Categories ဆိုတာ ဘာလဲ ? Objective-C tutorials တော်တော်များများမှာ categories ကို တွေ့နိုင်ပါတယ်။ အလွန်ပဲ အသုံးဝင်ပြီးတော့ code ကော သပ်သပ်ရပ်ရပ် ဖြစ်စေတယ်ဆိုလည်း မမှားပါဘူး။ အခုကျွန်တော်တို့တွေ မကြာခင် လေ့လာရတော့မှာပါ။ NSString function မှာ ကျွန်တော်တို့ ကိုယ်ပိုင် function တွေ ထည့်ချင်တဲ့ အခါတွေရှိပါတယ်။ ဥပမာ။။ a chatacters တွေကို 4 ပြောင်းလိုက်တဲ့ function မျိုးပေါ့။ ကျွန်တော်တို့တွေ NSString ကို subclass ရှိပြီး ကိုယ်တိုင် method ကိုယ့်ဘာသာကိုယ် ထည့်သွင်းနိုင်ပါတယ်။ subclass ပိုင်းကို ကျွန်တော်တို့တွေ car class ဆောက်တုန်းက တွေ့မြင်ဖူးမှာပါ။ subclass က တော်တော်ကောင်းမွန်ပါတယ်။ သို့ပေမယ့် categories က ပိုပြီး ပြည့်စုံကောင်းမွန်တယ်လို့ ဆိုလို့ရပါတယ်။

Categories က ကျွန်တော်တို့တွေကို methods အသစ်တွေကို ရှိနေတဲ့ class မှာ ထပ်ဖြည့်ထည့်ခွင့်ပေးထားပါတယ်။ ဥပမာ။။ 100 NSString Objects ကို သင့် app မှာ သုံးထားတယ်ဆိုပါဆို့။ reverstring function ကို extra method အနေနဲ့ ထည့်ချင်တယ်ဆိုရင်တော့ custom subclass ကို အသုံးပြုနိုင်ပါတယ်။ သို့ပေမယ့် Categories နဲ့ဆိုရင်တော့ ပိုပြီး ရိုးရှင်းပြီး လွယ်ကူတယ်လို့ ဆိုနိုင်ပါတယ်။ နောက်ပြီး ရှိနေဲ့ method တွေကိုလည်း overwrite လုပ်ပြီး အစားထိုးဖို့ကလည်း ဖြစ်နိုင်ပါတယ်။ Continue reading “Learn Objective-C : Day 6”

Order UITableViewCell Tutorial

ကျွန်တော်တို့တွေ ပြီးခဲ့တဲ့ tutorial တုန်းကတော့ delete လုပ်ပြီးပါပြီ။ Edit လုပ်လိုက်တဲ့အခါမှာ delete လုပ်ဖို့အတွက် အနှုတ် button လေးပြသလိုပဲ cell ကို drag & drop ရွှေ့လို့ရအောင်လည်း ဖန်တီးလို့ရပါတယ်။ ပြီးခဲ့ tutorial က file ကိုပဲ ပြင်ရအောင်။


- (void)tableView:(UITableView *)tableView moveRowAtIndexPath:(NSIndexPath *)fromIndexPath toIndexPath:(NSIndexPath *)toIndexPath {

}

အဲဒီ function လေး ထပ်ဖြည့်ပြီး run ကြည့်လိုက်ပါ။

Continue reading “Order UITableViewCell Tutorial”

UITableView Edit to Done Button

ကျွန်တော် UITableView Delete Tutorial မှာ တုန်းက Edit button နှိပ်လိုက်ရင် Delete လုပ်ဖို့အတွက် ပြောင်းသွားပါတယ်။ Edit ပြန်နှိပ်လိုက်ရင် UITableView က Edit ပုံစုံပြောင်းသွားပေမယ့် Edit ကတော့ Done မပြောင်းသွားပါဘူး။ ပြောင်းသွားအောင် နည်းနည်း ပြင်ဖို့လိုပါတယ်။

Continue reading “UITableView Edit to Done Button”

Writing jQuery Plugin Tutorial

jQuery မှာ plugin တွေ ဘယ်လောက် အသုံးဝင်သလဲဆိုတာ သိမှာပါ။ ကျွန်တော်တို့ ကိုယ်တိုင်လည်း jquery plugin တွေ ရေးလို့ရပါတယ်။ plugin ဆိုတာကလည်း function လိုပါပဲ။ ကျွန်တော်တို့ ထပ်ခါ ထပ်ခါလုပ်နေရတာကို လွယ်ကူအောင် ဖန်တီးပေးတာပါ။ ဥပမာ။။ အောက်က code လေးကို ကြည့်လိုက်ပါ။


<html>

<head>

<title>jQuery Sample</title>

<script type="text/javascript" src="http://ajax.googleapis.com/ajax/libs/jquery/1.4.2/jquery.min.js"></script>

<script src = "bgcolor.js"></script>

<script>

$(document).ready(function(){

changecolor($("#sample"),"red");

changecolor($("#sample2"),"#FF00FF");

});

function changecolor(id,value)

{

$(id).css("background-color",value);

}

</script>

</head>

<body>

<div id="sample">This is sample<div>

<div id="sample2">This is sample<div>

</body>

</html>

အဲဒီမှာ changecolor ဆိုတဲ့ function လေး ရေးထားပါတယ်။ အဲဒါကို ကျွန်တော်တို့ plugin ပြောင်းကြည့်ရအောင်။ function ခေါ်ရေးရင် ရပေမယ့် user friendly ဖြစ်သွားအောင် plugin ပြောင်းရေးတာပါ။ plugin ပြောင်းရေးလိုက်ရင် ကျွန်တော်တို့ အောက်ကလို ပြောင်းပြီး ခေါ်လို့ရသွားမှာပါ။

[lang name=”js”]

$(“#sample”).bgcolor();

$(“#sample2″).bgcolor({

value:”#FF00FF”

});

[/xhtml]

ပိုပြီး user friendly ဖြစ်ပြီး code ကြည့်လိုက်တာနဲ့ နားလည် လွယ်တာပေါ့။

အရင်ဆုံး bgcolor.js မှာ အောက်ကလို ရေးလိုက်ပါတယ်။


(function(jQuery){

jQuery.fn.bgcolor = function(options) {

return this.each(function() {

//write code in here

});

};

})( jQuery );

အဲဒါက jquery plugin ရေးဖို့ပေါ့။

jQuery.fn.bgcolor က bgcolor function ကို extend လုပ်လိုက်တာပေါ့။ selector တွေကနေ တဆင့် bgcolor ဆိုတဲ့ function ခေါ်လို့ရအောင်ပါ။ ကျွန်တော် code ကို အောက်ကလို ပြင်ရေးလိုက်ပါမယ်။


(function(jQuery){

jQuery.fn.bgcolor = function(options) {

var defaults = {

value:"red"

};

var options = jQuery.extend(defaults, options);

return this.each(function() {

$(this).css("background-color",options.value);

});

};

})( jQuery );

defaults က red လို့ပေးထားပါတယ်။ အဲဒါက JSON format ပါ။ JSON format ကို merge လုပ်ဖို့အတွက်

var options = jQuery.extend(defaults, options);

options ဆိုတဲ့ JSON parmater က value ပါလာရင် red ကို ဖျက်ပြီး အသစ်ပြောင်းသွားမှာပါ။

return this.each(function() {

//ဒီမှာ code ရေးရပါတယ်။

}

အဲဒီမှာက ကိုယ် ဖြစ်ချင်တဲ့ code ရေးရပါတယ်။ ကျွန်တောက်တော့ ရောက်လာတဲ့ selector ကို background color ပြောင်းထားပါတယ်။

HTML မှာ

<script src = "bgcolor.js"></script>

ထည့်ပြီးတော့ bgcolor ဆိုတဲ့ function ကို ခေါ်လိုက်ရင် background ပြောင်းသွားပါလိမ့်မယ်။ ပေါ်ချင်တဲ့ အရောင်ကိုတော့ value ကို ထည့်ပြီး ပြောင်းပေးလို့ရပါတယ်။


$("#sample").bgcolor();

$("#sample2").bgcolor({

value:"#FF00FF"

});

စမ်းကြည့်ချင်ရင်တော့ code ကို download ချပြီး စမ်းနိုင်ပါတယ်။

UITableView Add Tutorial

မနေ့က UITableView Delete ကို ပြောပြီးပါပြီ။ အဲဒီ delete မှာပဲ နည်းနည်း ပြန်ပြင်ပါမယ်။

- (void)viewDidLoad {

ရဲ့ အောက်ဆုံးမှာ အောက်ကလို ဖြည့်လိုက်ပါ။ Add button ကို navigation bar ရဲ့ ညာဘက် ထိပ်ဆုံးမှာ ထည့်လိုက်တာပေါ့။

//Crate Add Button
UIBarButtonItem * addButton = [[UIBarButtonItem alloc]
initWithBarButtonSystemItem:UIBarButtonSystemItemAdd
target:self action:@selector(addTable)];
self.navigationItem.rightBarButtonItem=addButton;

Continue reading “UITableView Add Tutorial”

UITableView Delete Tutorial

UITableView Tutorial ဆိုပြီးတော့ ကျွန်တော် ရေးပြီးပါပြီ။ ဆက်ပြီးတော့ ထည့်ထားတဲ့ record ကို ပြန်ဖျက်ဖို့ လုပ်ကြည့်ရအောင်။

ပထမဆုံး tableview နဲ့ ချိတ်ဆက်ဖို့အတွက် IBoutlet တစ်ခုကြေငြာဖို့လိုပါတယ်။ အဲဒီတော့ RootViewController.h မှာ ဒီလိုရေးလိုက်ပါတယ်။

#import

@interface RootViewController : UITableViewController {
NSMutableArray *listItem;
IBOutlet UITableView *tableview;
}
@property(nonatomic,retain) NSMutableArray *listItem;
@property(nonatomic,retain) IBOutlet UITableView *tableview;

@end

ပြီးရင်တော့

@synthesize tableview;

ကို RootViewController.m မှာ ဖြည့်ပေးဖို့နဲ့

[tableview release];

ကို dealloc မှာ ထည့်ပေးဖို့ မမေ့ဖို့လိုပါသေးတယ်။

RootViewController.xib ကို ဖွင့်ကြည့်လိုက်ပါ။ Bottom Bar မှာ Toolbar ရွေးလိုက်ပါ။ UITableView မှာ Toolbar ပေါ်လာပါလိမ့်မယ်။

အဲလို ပြောင်းပြီးရင် IBoutlet ချိတ်ဖို့အတွက် File’s Owner ကို click လုပ်ပါ။ ပြီးရင် ဒုတိယ tab ဖြစ်တဲ့ Connections Inspector ကို သွားပါ။ အဲဒီမှာ tableview ဆိုပြီး ပေါ်နေပါလိမ့်မယ်။ အဲဒီ tableview က ညာဘက် စက်ဝိုင်းလေးကို drag ဆွဲပြီး uitableview နဲ့ ချိတ်ပေးလိုက်ပါ။

ပြီးရင်တော့ coding ကို ပြန်သွားပါမယ်။
Continue reading “UITableView Delete Tutorial”

How to learn web development – 2

ကျွန်တော် ပထမပိုင်းမှာ Web Essential ပိုင်းနဲ့ ပတ်သက်ပြီး ရှင်းလင်းခဲ့ပါတယ်။ Web Development ပိုင်းကို မလေ့လာခင်မှာ web essential ပိုင်းက မသိမဖြစ်ဆိုလည်း မမှားပါဘူး။ Web Essential ပိုင်းကို လေ့လာရင်း web developer အစား web designer လိုင်းကို ပြောင်းသွားတဲ့ သူတွေလည်း ရှိပါတယ်။ ဒါကြောင့် develop မလုပ်ခင်မှာ ကိုယ် developer ပိုင်းသွားမလား Designer ပိုင်းသွားမလား ဘယ်ဟာပို စိတ်ဝင်စားလဲဆိုတာကိုလည်း သိရအောင် web essential ပိုင်းကိုတော့ သိသင့်ပါတယ်။
Continue reading “How to learn web development – 2”

How to learn web development

Web Development လုပ်တော့မယ်ဆိုရင် ကျွန်တော် ဒီပုံမှာ ပြခဲ့တာလေးကို တချက်ကြည့်စေချင်ပါတယ်။ ပုံထဲမှာ ကျွန်တော့်အနေနဲ့ Web Programming ကို မလေ့လာခင်မှာ HTML , CSS , Javascript ကို စတင်လေ့လာဖို့ ဆိုထားပါတယ်။ HTML , CSS က programming ပိုင်း မပါဝင်ပါဘူး။ တော်တော်များများဟာ HTML, CSS, Javascript က သေချာ မတတ်ကျွမ်းပဲနဲ့ Web Development ပိုင်းကို ကူးနေကြတာတွေကိုလည်း တွေ့ရပါတယ်။
Continue reading “How to learn web development”

Readability on blog [Poll]

အခု ထည့်ထားတဲ့ Readability အတွက် Poll လေးလုပ်ထားပါတယ်။ MZ Blog မှာ ထည့်ထားတဲ့ Readability သုံးဖြစ် မသုံးဖြစ်ပေါ့။

7 Cross Platform iOS and Android Solutions

iOS ကို သာမက Android ပါ run လို့ ရအောင် application တွေ ရေးဖို့အတွက် SDK List လေးပါ။

Native App Creators

Airplay SDK – သူကတော့ game company တော်တော်များများ အသုံးပြုကြပါတယ်။ cross platform applications အတွက် game ရေးဖို့ဆိုရင် အဆင်ပြေပါတယ်။ 2D/3D Game တွေ ရေးဖို့အတွက် အဆင်ပြေပါတယ်။

Corona SDK – Lua ကို သုံးပြီး app တွေရေးဖို့အတွက်ဆိုရင်တော့ Corona ရှိပါတယ်။ သူကတော့ Actionscript 2.0 နဲ့ တူပါတယ်။ Adobe Developer အဟောင်းတွေက တည်ထောင်ထားတာပါ။ တန်ဖိုးကတော့ $99 per year ပေးဆောင်ရပါတယ်။

Flash CS5 (Adobe Air for iOS ) – Packager ကို သုံးပြီး iOS အတွက် Flash CS5 apps တွေ ဖန်တီးလို့ရပါတယ်။ Mac ကို သုံးစရာမလိုပဲ ရေးလို့ရပါတယ်။ စျေးနှုန်းကတော့ $600 ဝန်းကျင်ရှိပြီးတော့ upgrade လုပ်တာဆိုရင်တော့ $200 ပေးရပါလိမ့်မယ်။

Unity – Game တွေအတွက် သီးသန့်ဆိုရင်တော့ Unity ရှိပါတယ်။ သူက 3D object တွေအတွက် Editor ပါပြီးသားဆိုတော့ တော်တော်လေးကို ကောင်းမွန်တယ်လို့ ဆိုရပါမယ်။ ထို့အတူ စျေးလည်း ကောင်းပါတယ်။ iPhone သီးသန့်အတွက် Unity ဆိုရင် $300 လောက်ပေးရမှာဖြစ်ပြီး Unity Pro ဆိုရင်တော့ $1500 လောက်ကုန်ပါလိမ့်မယ်။ Android အတွက်ပါရေးမယ်ဆိုရင်တော့ $3000 လောက်တော့ ကုန်ကျပါမယ်။

Hybrid App Creators (HTML/Javascript and HTML/ruby based)

Appcelerator – native app ကို HTML/Javascript ကို သုံးပြီး ရေးလို့ရမယ့် နည်းလမ်းပေါ့။ UIWebView ကို သုံးပြီး iPhone မှာ run တာပေါ့။ သူက Free ပါပဲ။

Phonegap – Appcelerator နဲ့ အတူတူပါပဲ။ သူကတော့ Appcelerator ထက်စာရင် ရေးရတာ ပိုလွယ်ပြီးတော့ support နဲ့ communities အားကောင်းတယ်လို့ ဆိုရပါမယ်။

Rhomobile – Ruby ကို သဘောကျတဲ့သူတွေအတွက်ကတော့ Rhomobile က အဆင်ပြေပါလိမ့်မယ်။ ROR သမားတွေ အကြိုက်ပေါ့။ noncommericial application အတွက် free ပါ။

Conclusion

Flash သမားတွေအတွက်တော့ Flash CS5 က အသင့်တော်ဆုံးပေါ့။ Airplay SDK ကတော့ စိတ်ဝင်စားဖို့ကောင်းတဲ့ SDK ဆိုလည်း မမှားပါဘူး။ Corona ကတော့ စျေးနည်းနည်းများတယ်လို့ ထင်ပါတယ်။ နောက်ပြီး Lua language ကိုလည်း လေ့လာဖို့ လိုလိမ့်မယ်။ Corona စျေးများတာကတော့ Unity စျေးများတာကို မမှီဘူးလို့ဆိုရမလားပဲ။ သို့ပေမယ့် Unity က Game Development အတွက် တော်တော်လေးကို ကောင်းမွန်ပါတယ်။ Game Development အတွက် invest မလုပ်ဘူးဆိုရင်တော့ မစဉ်းစားသင့်ပါဘူး။

HTML/Javascript solutions အတွက်ဆိုရင်တော့ Appcelerator ဖြစ်ဖြစ် Phonegap ဖြစ်ဖြစ် အဆင်ပြေပါတယ်။ web developer တွေအတွက် iPhone , Android app အမြန်ရေးဖို့အတွက်ပေါ့။ Appcelerator ကတော့ သူ့ javascript တွေ သိထားဖို့လိုတယ်။ ထပ်လေ့လာဖို့လိုတာပေါ့။ Phonegap ကတော့ လက်ရှိ HTML5 application ကို iPhone , Android အတွက် ချက်ခြင်း ပြောင်းလိုက်ရုံပဲလေ။ ROR သမားတွေအတွက်တော့ ထွေထွေထူးထူး ပြောစရာလိုမယ်မထင်။ Rhomobile က အဆင်ပြေဆုံး ဖြစ်လိမ့်မယ်။

reference: http://maniacdev.com/2010/09/cross-platform-iphone-and-android-solutions/