UITableView Tutorial ဆိုပြီးတော့ ကျွန်တော် ရေးပြီးပါပြီ။ ဆက်ပြီးတော့ ထည့်ထားတဲ့ record ကို ပြန်ဖျက်ဖို့ လုပ်ကြည့်ရအောင်။
ပထမဆုံး tableview နဲ့ ချိတ်ဆက်ဖို့အတွက် IBoutlet တစ်ခုကြေငြာဖို့လိုပါတယ်။ အဲဒီတော့ RootViewController.h မှာ ဒီလိုရေးလိုက်ပါတယ်။
#import

@interface RootViewController : UITableViewController {
NSMutableArray *listItem;
IBOutlet UITableView *tableview;
}
@property(nonatomic,retain) NSMutableArray *listItem;
@property(nonatomic,retain) IBOutlet UITableView *tableview;

@end
ပြီးရင်တော့
@synthesize tableview;
ကို RootViewController.m မှာ ဖြည့်ပေးဖို့နဲ့
[tableview release];
ကို dealloc မှာ ထည့်ပေးဖို့ မမေ့ဖို့လိုပါသေးတယ်။
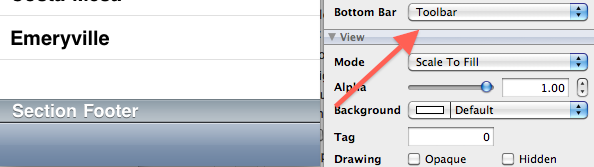
RootViewController.xib ကို ဖွင့်ကြည့်လိုက်ပါ။ Bottom Bar မှာ Toolbar ရွေးလိုက်ပါ။ UITableView မှာ Toolbar ပေါ်လာပါလိမ့်မယ်။
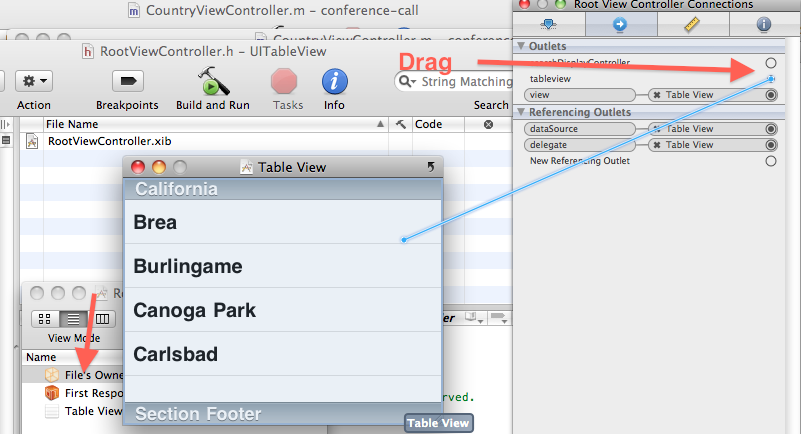
အဲလို ပြောင်းပြီးရင် IBoutlet ချိတ်ဖို့အတွက် File’s Owner ကို click လုပ်ပါ။ ပြီးရင် ဒုတိယ tab ဖြစ်တဲ့ Connections Inspector ကို သွားပါ။ အဲဒီမှာ tableview ဆိုပြီး ပေါ်နေပါလိမ့်မယ်။ အဲဒီ tableview က ညာဘက် စက်ဝိုင်းလေးကို drag ဆွဲပြီး uitableview နဲ့ ချိတ်ပေးလိုက်ပါ။
ပြီးရင်တော့ coding ကို ပြန်သွားပါမယ်။
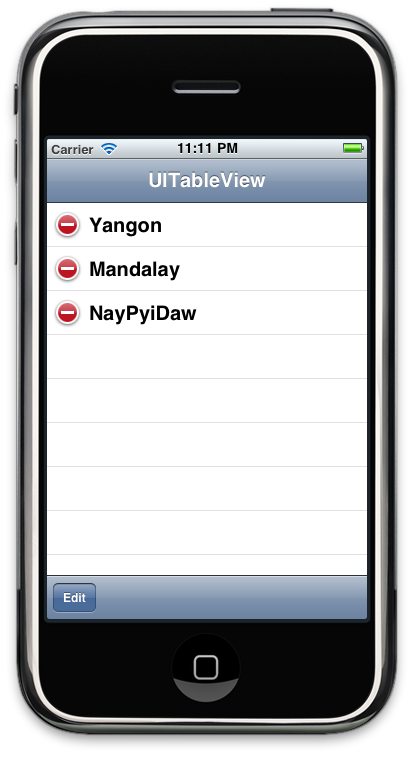
ကျွန်တော်တို့တွေ delete လုပ်ဖို့ အတွက် button ထည့်ပါမယ်။ Edit ဆိုတဲ့ button ကို နှိပ်ရင် UITableView က row ကို delete လုပ်လို့ရပါမယ်။ အဲဒီတော့ edit button ကို အောက်ကလို ထည့်လိုက်ပါတယ်။
- (void)viewDidLoad {
[super viewDidLoad];

self.navigationItem.title=@"UITableView";
listItem=[[NSMutableArray alloc]init];

[listItem addObject:@"Yangon"];
[listItem addObject:@"Mandalay"];
[listItem addObject:@"NayPyiDaw"];

//Create Edit Button
UIBarButtonItem * editButton = [[UIBarButtonItem alloc]
initWithBarButtonSystemItem:UIBarButtonSystemItemEdit
target:self action:@selector(editTable)];

//Create Toolbar Button Array
NSArray *toolbaritem=[NSArray arrayWithObjects:editButton,nil];
[self setToolbarItems:toolbaritem];

//show toolbar in view
[[self navigationController] setToolbarHidden:NO animated:YES];

}
အပေါ်က code တွေကတော့ သိပြီးသားတွေပါ။ အောက်ပိုင်းမှာ အရင်ဆုံး Edit UIBarButtonItem တစ်ခုကို တည်ဆောက်လိုက်ပါတယ်။
UIBarButtonItem * editButton = [[UIBarButtonItem alloc]
initWithBarButtonSystemItem:UIBarButtonSystemItemEdit
target:self action:@selector(editTable)];
selector မှာ editTable ဆိုတာကို ကျွန်တော်တို့တွေ ထည့်ထားပါတယ်။ ဒါကြောင့် editTable ဆိုတဲ့ function ကို ကျွန်တော်တို့ ထပ်ရေးပေးဖို့ လိုပါတယ်။
ပြီးတဲ့ အခါမှာတော့ ToolbarItem Array List ထဲထည့်လိုက်တယ်။ toolbarItem Array List ကတော့ တစ်ခုထက် မက ထည့်ဖို့အတွက်ပါ။ အခု tutorial မှာတော့ တစ်ခုပဲရှိတယ်။ ပြီးတဲ့အခါမှာတော့ Toolbaritem ကို ဖြည့်လိုက်ပါတယ်။ အဲဒီ အဆင့်နဲ့တင် မရသေးပါဘူး။ toolbar item က default အားဖြင့် ပျောက်နေပါတယ်။ ဒါကြောင့် hidden မလုပ်ဘူးဆိုပြီး ကြေငြာပေးဖို့လိုပါတယ်။
//Create Toolbar Button Array
NSArray *toolbaritem=[NSArray arrayWithObjects:editButton,nil];
[self setToolbarItems:toolbaritem];

//show toolbar in view
[[self navigationController] setToolbarHidden:NO animated:YES];
အခု editTable function ကို ရေးပါမယ်။
- (void) editTable {
//edit action
[self.tableview setEditing: !self.tableview.editing animated: YES];
}
ရေးထားတာက ရှင်းရှင်းလေးပါ။ tableview က IBoutlet နဲ့ အပေါ်မှာ ကျွန်တော်တို့တွေ ချိတ်ထားပါတယ်။ ဒါကြောင့် tableview variable ကို command ပေးတာဟာ UITableView ကို ခိုင်းလိုက်တာနဲ့ အတူတူပါပဲ။ Edit မဟုတ်ရင် Edit mode ပြောင်းခိုင်းလိုက်တယ်။ Edit ဖြစ်နေရင် Edit mode ကို ပြန်ပိတ်လိုက်တယ်။ တနည်းပြောရင် Edit Button ကို နှိပ်ရင် table က edit mode ပြောင်းသွားပြီး edit ကို ပြန်ထပ်နှိပ်ရင် ပြန်ပျောက်သွားမယ်လို့ဆိုလိုတာပါ။
delete လုပ်ဖို့အတွက်ကတော့
// Override to support editing the table view.
- (void)tableView:(UITableView *)tableView commitEditingStyle:(UITableViewCellEditingStyle)editingStyle forRowAtIndexPath:(NSIndexPath *)indexPath {

if (editingStyle == UITableViewCellEditingStyleDelete) {
// Delete the row from the data source.
[listItem removeObjectAtIndex:indexPath.row];
[tableView deleteRowsAtIndexPaths:[NSArray arrayWithObject:indexPath] withRowAnimation:UITableViewRowAnimationFade];
[tableView reloadData];
}
}
Delete ဖျက်ဖို့အတွက် အရင်ဆုံး listItem ထဲက object ကို အရင် ဖျက်ရပါမယ်။ ပြီးမှ tableView ထဲက item ကို ဖျက်ပါတယ်။ အဲဒါထည့်ပြီးပေမယ့် အလုပ်လုပ်အုံးမှာ မဟုတ်သေးဘူး။ table ကို ပြန်ပြီး reload ခေါ်ပေးရပါတယ်။ ကဲ… ဒီလောက်ဆို သိပြီလို့ ထင်ပါတယ်။ မရှင်းတာတွေကို comment မှာ မေးထားခဲ့နိုင်ပါတယ်။
2 Replies to “UITableView Delete Tutorial”