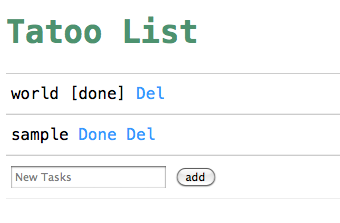
အခု task တစ်ခု ပြီးသွားတဲ့ ကိစ္စကို သွားရအောင်။ Done ကို နှိပ်လိုက်တာနဲ့ /done/:id ကို သွားမယ်။ ပြီးရင် ပြန်လာမယ်။
ဒါကြောင့် အောက်ကလို ရေးလိုက်တယ်။
app.get('/done/:id',function(req,res){
   taskProvider.closeByid("saturngod",req.params.id,function(error,result){
      res.redirect('/');
   });
});
ပြီးတဲ့ အခါ ကျွန်တော်တို့မှာ closeByid မရှိသေးဘူး။ closeByiD က username နဲ့ task id ပေါ်မှာ မူတည်ပြီး done ကို 1 ဆိုပြီး update လုပ်ပေးရမယ်။ ဒါကြောင့် set ကို သုံးပြီး current id သိအောင် $.done နဲ့ သုံးရမယ်။ code ကို အောက်မှာ ကြည့်လိုက်ပါ။ dataprovider.js မှာ အောက်ကလို ဖြည့်လိုက်တယ်။
DataProvider.prototype.closeByid=function(username,taskId,callback) {
    this.getCollection(function(error,task_collection){
        if(error) callback(error);
        else {

           task_collection.update({user:username,'todo.id':Math.floor(taskId)}, {"$set":{"todo.$.done":1}},{safe:true},function(error, result){
                                      if( error ) callback(error,result);
                                      else callback(null,result)

                                 });

        }
    });
}
အခု ထပ်ပြီးတော့ del ကို ရေးမယ်။ del ကလည်း update လုပ်သလိုပါပဲ။ ကွာသွားတာက delete နဲ့ update ပါပဲ။
app.get('/del/:id',function(req,res){
   taskProvider.remove("saturngod",req.params.id,function(error,result){
      res.redirect('/');
   });
});
data-provider.js မှာ remove function ထပ်ဖြည့်ပါမယ်။ remove လုပ်တဲ့အခါမှာ ပထမဆုံး unset လုပ်ပါတယ်။ ပြီးမှ အကုန်လုံးကို pull ဆွဲပြီးတော့ clear လုပ်ပါတယ်။ တစ်ခါတည်း တန်းပြီး delete မလုပ်ပါဘူး။
DataProvider.prototype.remove=function(username,taskId,callback){
   this.getCollection(function(error,task_collection){
       //set null
       task_collection.update({user:username,'todo.id':Math.floor(taskId)},{"$unset":{"todo.$":1}},{safe:true},function(error,result){
           if( error ) callback(error,result);
           else {
               //clear remove object
                task_collection.update({user:username},{"$pull":{todo:null}},{safe:true},function(error,result){
                    if( error ) callback(error)
                    else callback(null, result);
                });
           }
       });
   });
}
နောက်ဆုံး တစ်ခုဖြစ်တဲ့ add ပဲ။
app.post('/add',function(req,res){
   taskProvider.add("saturngod",req.param("task"),function(error,result){
        res.redirect('/');
     });

});
Add အတွက်က database မှာ push လုပ်ပါမယ်။ တစ်ခု သတိထားသင့်တာက ကျွန်တော်တို့တွေ last id ကို မှတ်ထားခဲ့ပါတယ်။ အဲဒီ last id ကို 1 တိုးသွားမှာပါ။ last id ကို ဆွဲထုတ်လုပ်တဲ့အခါမှာ တစ်ခါတစ်လေ number အနေနဲ့ မသိတော့ push ပြန်လုပ်တဲ့အခါမှာ ပြဿနာလေးတွေ ဖြစ်တတ်တယ်။ ဒါကြောင့် သေချာအောင် Math.floor ကို ကျွန်တော် သုံးပါမယ်။
DataProvider.prototype.add=function(username,taskname,callback) {
    this.getCollection(function(error,task_collection){
        //try to get latest id
        task_collection.findOne({user:username},function(error,result){
            if( error ) callback(error,result);
            else {
                //increase id, add id by latest id
                task_collection.update({user:username},{"$push":{todo:{id:Math.floor(result.lastid)+1,desc:taskname,done:0}},"$inc":{lastid:1}},{safe:true},function(error,result){
                    if( error ) callback(error)
                    else callback(null, result);
                });
            }
        });
    });
}
ကဲ .. ဒါဆိုရင် အားလုံး ပြီးပြီဗျာ။
အခု ကျန်တာက view ပိုင်းပဲ။ view ကို ဆက်ရအောင်။
ကျွန်တော်တို့ public folder အနေနဲ့ index.js မှာ
app.use("/public",express.static(__dirname + '/public'));
ဆိုပြီး app.configure အနေနဲ့ ရေးခဲ့ပါတယ်။ __dirname ဆိုတာက လက်ရှိ ရှိတဲ့ directory name အောက်က /public folder က public directory ဆိုပြီး ကြောငြာခဲ့တာပါ။ အဲဒီ directory ကို /public နဲ့ ခေါ်မယ်လို့ ကြေငြာထားပါတယ်။
ဒါကြောင့် public folder ဆောက်လိုက်မယ်။ ပြီးရင် style.css ကို ထပ်ဆောက်လိုက်တယ်။ style.css ကို အောက်ကလို ရေးလိုက်ပါတယ်။
body {
  font-family: Consolas, Menlo, Monaco, Lucida Console, Liberation Mono, DejaVu Sans Mono, Bitstream Vera Sans Mono, Courier New, monospace, serif;
}
h1 {
  color: #4d926f;
}
a, a:link, a:visited {
  text-decoration: none;
  color: #3399ff;
}
a:hover {
  text-decoration: underline;
}
ul, li {
  list-style: none;
  margin: 0px;
  padding: 0px;
}
li {
  border-top: 1px solid #cccccc;
  border-bottom: 1px solid #eeeeee;
  padding: 10px 5px;
}
li:hover {
  background: #b6e0ff;
}
အခု html ပိုင်းကို သွားရအောင်။ views/index.html မှာ ကျွန်တော်တို့ add link , del link နဲ့ done link တွေ ကို ထည့်ပြီးသားပါ။ သေချာအောင် ပြန်စစ်ကြည့်ပါ။
<h1>Tatoo List</h1>
<ul>
{{each list}}


<li>${$value.desc}
{{if $value.done == 0}}
<a href="/done/${$value.id}">Done</a>
{{else $value.done==1}}
[done]
{{/if}}

<a href="/del/${$value.id}">Del</a>
</li>

{{/each}}
<li>
<form action="/add" method="post">
<input type="text" name="task" placeholder="New Tasks">
<input type="submit" value="add">
</form>
</li>
</ul>
layout.html မှာ လည်း style.css နဲ့ ချိတ်ထားပြီးသားပါ။ သေချာအောင်လည်း layout.html ကို ပြန်စစ်ကြည့်ပါ။
<!DOCTYPE HTML>
<html>
<head>
<title>${title}</title>
<link rel="stylesheet" href="/public/style.css" type="text/css" media="screen" title="main css" charset="utf-8">
<head>
<body>
{{html body}}
</body>
</html>
ကဲ .. အကုန်ပြီးရင် run ကြည့်ရအောင်။ မ run ခင်မှာ အရင်ဆုံး mongod ကို run ဖို့ မမေ့ပါနဲ့။ terminal ကနေ အရင်ဆုံး
$sudo mongod
နောက် terminal ကနေ
$node index.js
ပြီးရင် localhost:3000 ကို ခေါ်ကြည့်လိုက်ရင် အောက်ကလို မြင်ရပါမယ်။ funcation အားလုံးကို စမ်းကြည့်ပါ။ နားမလည်တာရှိရင် comment ပေးခဲ့လို့ရပါတယ်။ source ကို လည်း download ချပြီး စမ်းနိုင်ပါတယ်ခင်ဗျာ။

အခု ဆိုရင်တော့ mongodb နဲ့ node ကို အတန်သင့်သလောက် နားလည်သွားပြီလို့ ထင်ပါတယ်ဗျာ။

One Reply to “Making Todolist with node.js and mongo Part VII”