Node.js နဲ့ Mongodb ကို အသုံးပြုပြီးတော့ Todo list လေး တစ်ခု တည်ဆောက်ပုံကို ရေးပြပါမယ်။ Todo list မှာ ဘာ feature တွေ ပါမလဲဆိုတော့ ထည့်မယ်။ ဖျက်ပြီ။ ပြီးသွားတဲ့ task တွေကို done လုပ်တာ ပါမယ်။ ဒီလောက်ပါပဲ။
Node.js
အရင်တုန်းကတော့ Javascript ဆိုတာ web browser client side တွေမှာ အလုပ်လုပ်တဲ့ script ပါ။ အခုအခါမှာတော့ Google V8 ကြောင့် Javascript ကို server side မှာ အသုံးပြုလို့ရလာပါပြီ။ Node.js ဟာ Google V8 ကို အသုံးပြုထားတဲ့ Event I/O framework ပါ။ Node.js က အရမ်းကို မြန်ပါတယ်။ PHP ထက်လည်း မြန်ပါတယ်။ နောက်ပြီးတော့ Real Time application တွေ ဖြစ်တဲ့ Friendfeed , Google Wave တို့လို့ application တွေကို လွယ်လွယ်နဲ့ ရေးလို့ရပါတယ်။ Nodejs ဟာ threads တွေ အစား event loop ကို အသုံးပြုထားပြီး concurrent connection millions အတွက် ကောင်းကောင်း အသုံးပြုနိုင်ပါတယ်။ file read write တွေ အသုံးပြုလို့ရသလို အခြား web service api တွေကိုလည်း ခေါ်သုံးလို့ရပါတယ်။
Step 1. Installtion
Node.js ဟာ Mac OS X , Linux နဲ့ FreeBSD တွေ မှာပဲ သုံးလို့ရပါတယ်။ Windows အသုံးပြုနေရင်တော့ ဒီ post series ကို ဆက်မဖတ်ပါနဲ့တော့။ Windows သမားတွေအနေဲ့ Cygwin ကို အသုံးပြုလို့ရသလို virtual box မှာ Ubuntu linux တင်ပြီး အသုံးပြုတာ ပိုအဆင်ပြေပါလိမ့်မယ်။ Windows မှာ Cygwin နဲ့ သွင်းပုံကို ဒီမှာ ဖတ်နိုင်ပါတယ်။
Linux သမားတွေအနေနဲ့ကတော့ ဘာမှ မလိုအပ်ပါဘူး။ သို့ပေမယ့် python 2.4 နဲ့ အထက်နဲ့ libss-dev ကိုတော့ သွင်းထားပေးဖို့လိုပါတယ်။
Mac OSX သမားတွေအနေနဲ့ကတော့ Xcode ကို သွင်းထားဖို့ လိုပါတယ်။ ဒါကြောင့် XCode ကို အရင် download ချပြီး မှ သွင်းလို့ရပါလိမ့်မယ်။
Github ကနေ ပြီးတော့ Node ကို download ချလိုက်ပါ။ အခု လက်ရှိ version ကတော့ 0.4.8 ဖြစ်တဲ့အတွက် 0.4.8 ကို download ချပါ ။ ပြီးသွားရင် zip ကို ဖြည်ချလိုက်ပါ ။ ပြီးရင် download ချပြီး zip ဖြည်ထားတဲ့ folder ထဲကို terminal ကနေ သွားလိုက်ပါ။
ဥပမာ။။
$ cd ~/Download/joyent-node-v0.4.8-0-g7dd22c2/joyent-node-950a048/
folder name တွေကတော့ တစ်ယောက်နဲ့ တစ်ယောက် တူမှာမဟုတ်ပါဘူး။ အခု cd နဲ့ သွားထားတာက example အနေနဲ့ ပြထားတာပါ။ cd နဲ့ node folder ထဲရောက် ပြီးရင် compile လုပ်ပါမယ်။
$export JOBS=2 # optional, sets number of parallel commands.
$mkdir ~/local
$./configure --prefix=$HOME/local/node
$make
$sudo make install
$export PATH=$HOME/local/node/bin:$PATH
ပြီးသွားရင် node command ကို ခေါ်ကြည့်ပါ။ ခေါ်လို့ရရင် Ctrl+ C နဲ့ ပြန်ထွက်ပြီး terminal ကို ပိတ်ပါ။ ပြီးရင် terminal ဖွင့်ပြီး
တကယ်လို့ ခေါ်လို့ မရရင်တော့ home folder အောက်မှာ .profile ဆိုတဲ့ file ကို vi ဆောက်ပါ။ home folder အောက်မှာ .profile သို့မဟုတ် .profile_bath ရှိမရှိ စစ်ပါ။ .bash_profile ရှိရင် တော့ .bash_profile ကိုပဲ vi နဲ့ ပြင်ပါမယ်။
$vi ~/.profile
သို့မဟုတ်
$vi ~/.profile_bath
ပြီးရင်
PATH=$HOME/local/node/bin:$PATH
ကို ဖြည့်လိုက်ပါ။
$ source ~/.profile
ဆိုပြီး load ပြန်လုပ်ပေးလိုက်ရင် ရပါပြီ။ terminal ကနေ node ခေါ်လို့ရရင်တော့ node.js ကို စရေးဖို့ အသင့်ဖြစ်ပါပြီ။
Hello World
index.js file ကို တနေရာတွင် ဆောက်လိုက်ပါ။ ကျွန်တော်ကတော့ Home folder အောက်မှာပဲ ဆောက်ထားလိုက်ပါတယ်။
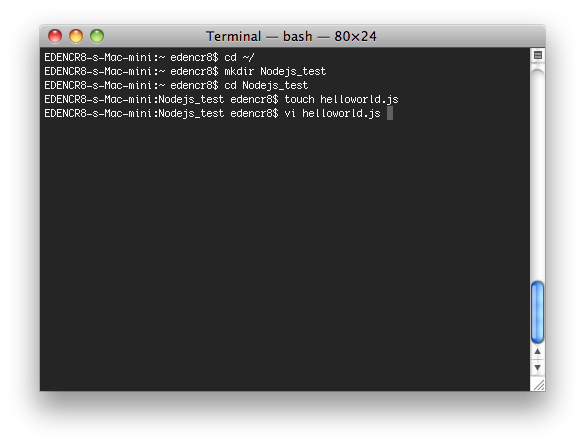
$cd ~/
$mkdir Nodejs_test
$cd Nodejs_test
$touch helloworld.js
ပြီးရင် နှစ်သက်ရာ editor နဲ့ ဖွင့်လိုက်ပါ။ ကျွန်တော်ကတော့ vi နဲ့ပဲ ဖွင့်လိုက်ပါတယ်။ ( vi မသုံးတတ်ရင် မသုံးပါနဲ့။ နှစ်သက်ရာ editor ကို သုံးနိုင်ပါတယ်။ )

$vi helloworld.js
ပြီးရင် အောက်ကလို ရိုက်ကြည့်လိုက်ပါ။
var sys=require('sys');
sys.puts('Hello World');
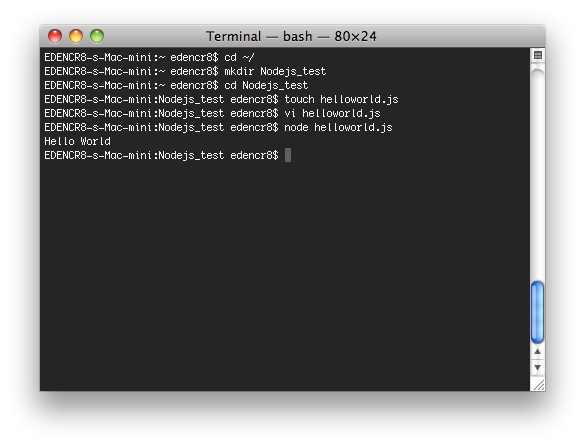
ပြီးရင် save လုပ်ပြီးတော့ terminal ကနေ run ပါမယ်။
$node helloworld.js
Hello World
ဆိုပြီး return ပြန်လာတာ တွေ့ပါလိမ့်မယ်။ ကဲ.. အဲဒီ helloworld.js ကို အောက်ကလို ထပ်ပြင်ပါမယ်။

var sys = require("sys");
    http = require("http");

http.createServer(function(request, response) {
    response.writeHead(200, {"Content-Type": "text/html"});
    response.end("Hello World!");
}).listen(3000);

sys.puts("Server running at http://localhost:3000/");
ပြီးရင် terminal ကနေ ပြန် run ပါမယ်။
$node helloworld.js
Server running at http://localhost:3000/
ပြီးရင် browser ကနေ localhost:3000 ကို ရိုက်ပြီးခေါ်ကြည့်လိုက်ပါ။ Hello World ပေါ်နေတာကို တွေ့ရပါမယ်။

ကျွန်တော် macbook pro ပျက်သွားလို့ ပြင်ဖို့ ဆိုင်ပို့ထားရလို့ ရုံးကနေ မပြန်သေးပဲ ရေးနေတာပါ။ အိမ်ပြန်လည်း နောက်ကျနေပြီမို့ ဒီနေ့တော့ ဒီလောက်ပါပဲ။ နောက်နေ့ တွေမှာ npm သွင်းနည်းကို ရှင်းပြပါမယ်။

Thanks for introduction of node.js!
I am using v0.5 pre and sendHeader and close functions are not working. Are they working on stable 0.48?
I needed to use writeHead and end functions.
If u are learning , why use pre or unstable version. Pre and unstable version for developer who can report bugs. We are just leaning and should not use pre. Please use stable version for now. It is working perfect for me.
I just changed it to v0.4.8 and it still is not working and still need to change to writeHead and end() function. I just checked out changelog and i found out that
–2010.02.22, Version 0.1.30, bb0d1e65e1671aaeb21fac186b066701da0bc33b
–http.ServerResponse.prototype.sendHeader() renamed to writeHeader(). Now accepts reasonPhrase.
/Users/apple/Nodejs_test/helloworld.js:5
response.sendHeader(200, {“Content-Type”: “text/html”});
^
TypeError: Object # has no method ‘sendHeader’
at Server. (/Users/apple/Nodejs_test/helloworld.js:5:14)
at Server.emit (events.js:67:17)
at HTTPParser.onIncoming (http.js:1123:12)
at HTTPParser.onHeadersComplete (http.js:108:31)
at Socket.ondata (http.js:1018:22)
at Socket._onReadable (net.js:683:27)
at IOWatcher.onReadable [as callback] (net.js:177:10)
WHY? Is this sendHeader error that mention above @Soe Naung Win????
updated the code. Please check the helloworld code again. Now, I’m using writeHead and close for Helloworld program.
now, solved with writeHead instead of sendHeader